GTM for Magento 2
MarketingIntroduction:
Google Tag Manager is a tool that allows a marketer or entrepreneur to manage and deploy marketing tags which are usually snippets of code or tracking pixels on the website or mobile app without having to modify the code.
GTM works this way: Data, via the Google Tag Manager, Data from one data source (from a website) is shared with another source of data (Google Analytics).
The GTM becomes considerably easy to use when a site has numerous tags to manage, since all code is stored in a single location.
A huge benefit of GTM is that the marketer can manage the code on their own without the help of developers.
Basic Concepts
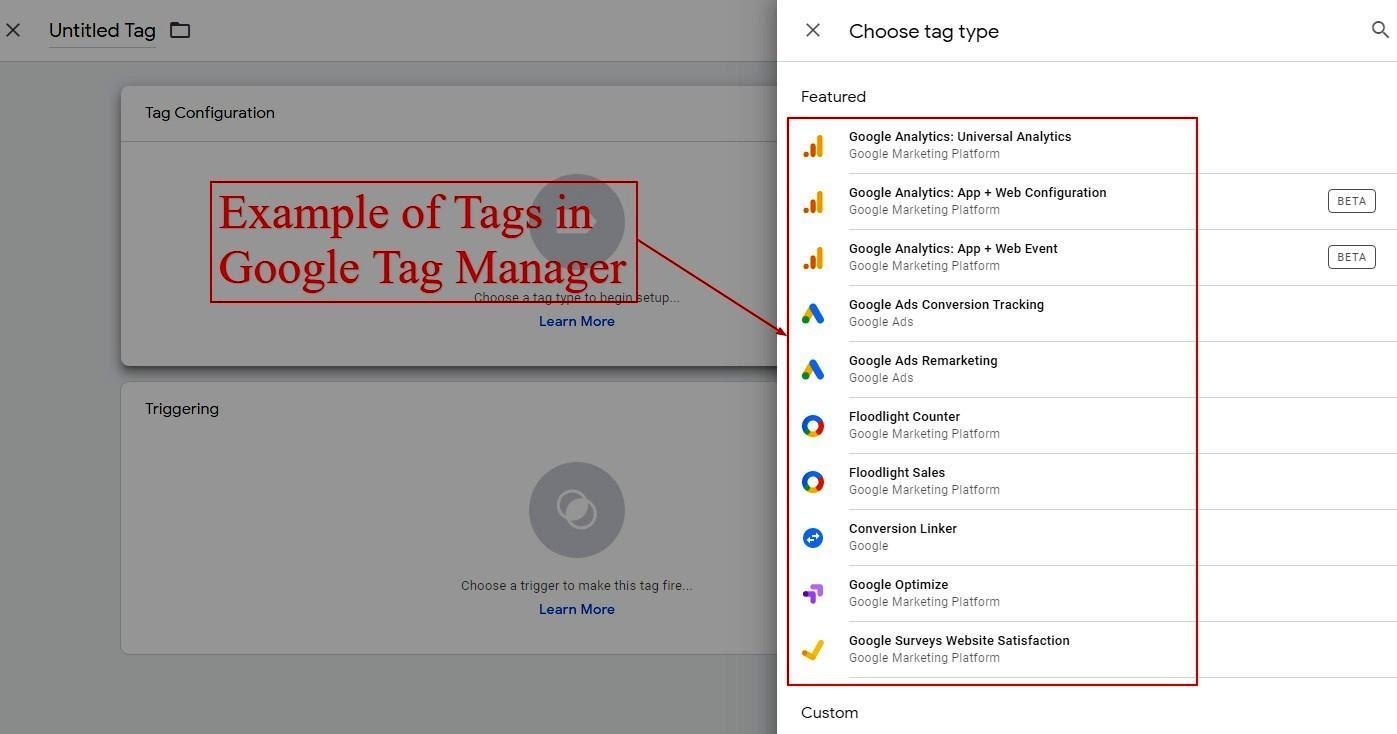
1) GTM Tags: Tags are basically snippets of code or tracking pixels. These are used from the third-party tools and guide GTM what to do.
Within the GTM, the following are examples of common tags used:
- Universal Tracking Code of Google Analytics.
- Conversion tracking code of Adwords.
- Adwords Remarketing Code.
- Facebook pixels
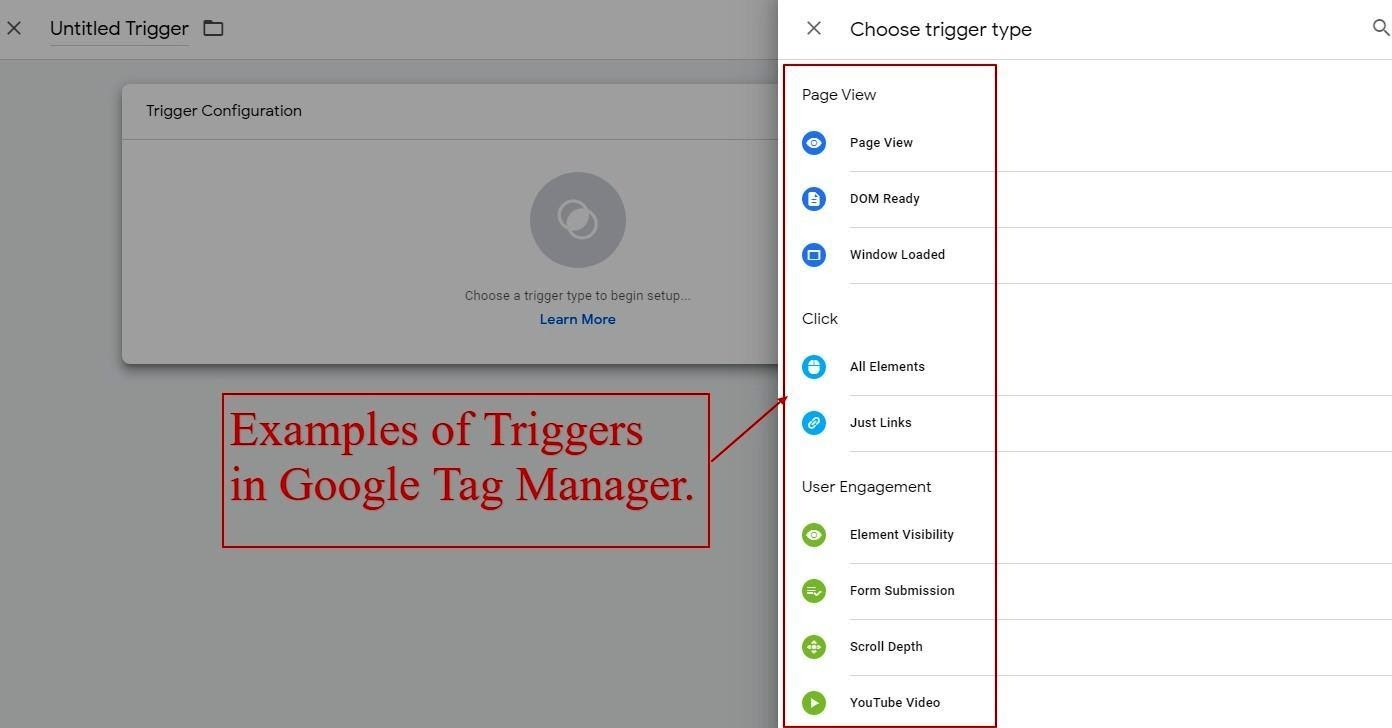
2) GTM Triggers: Triggers are a way to fire or trigger the events or tags that you set up. Triggers listen to the web page or mobile app for various events like button clicks, form submissions, etc. The trigger guides the tag to fire when the specified event is detected. At least one trigger is must for every tag.
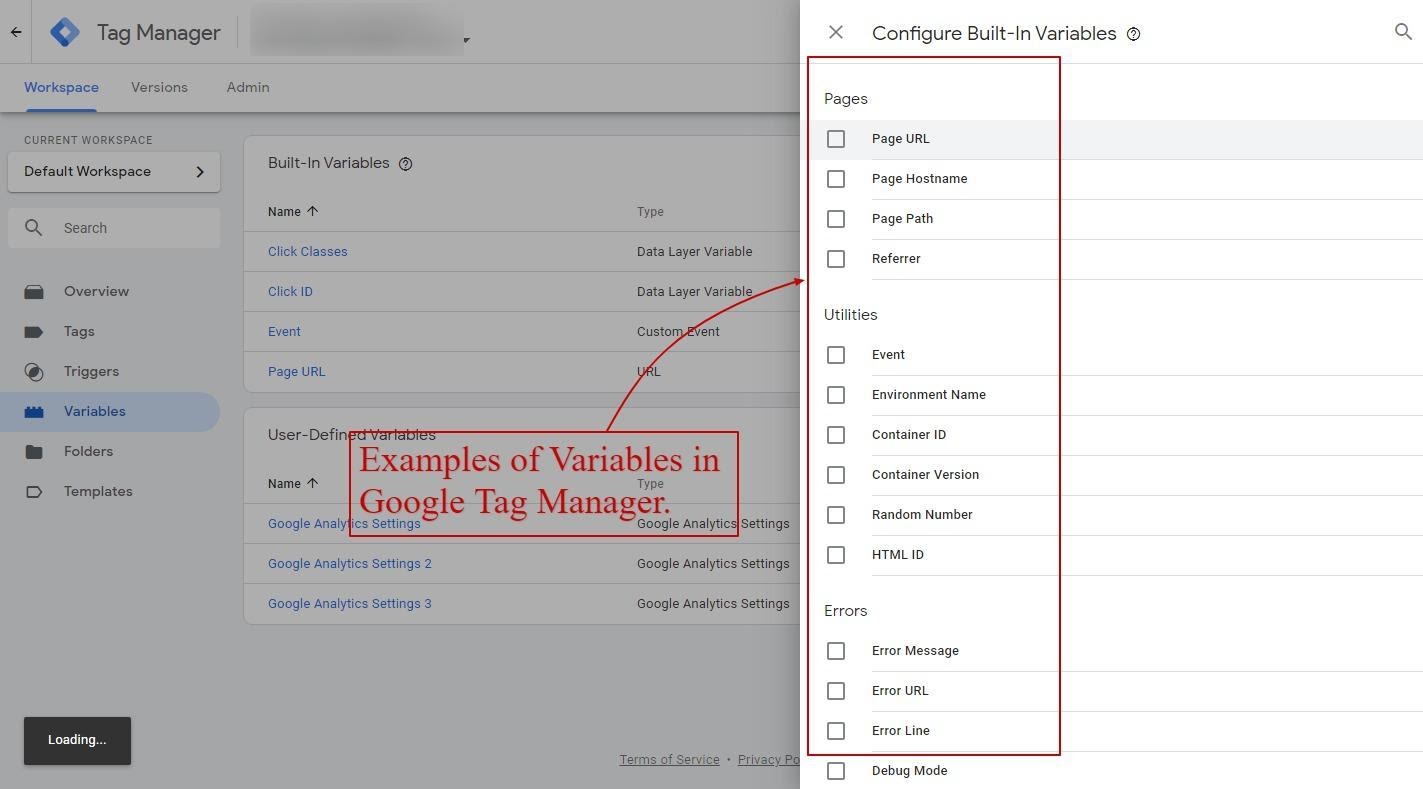
3) GTM Variables: A variable could either be a named placeholder for a value, or a function, which could be called from within the trigger, tag, or from another variable. Furthermore, a variable will guide GMT where to fire the tag.
Benefits of using Google Tag Manager
- Setup and keep track of the basic events, such as the page views, PDF download, button clicks, or outbound links.
- GTM might help the online site to load faster depending on the tags that we generated.
- Usually, GTM is triggered with none-products of Google.
- There is a dedicated place for all the third-party code.
- There is an advantage in GTM that it has a preview and debug mode. By that, we can see what’s successfully working and what’s not before we decide to make it live. It displays which tags are fired on that page.
Setting up with the GTM:
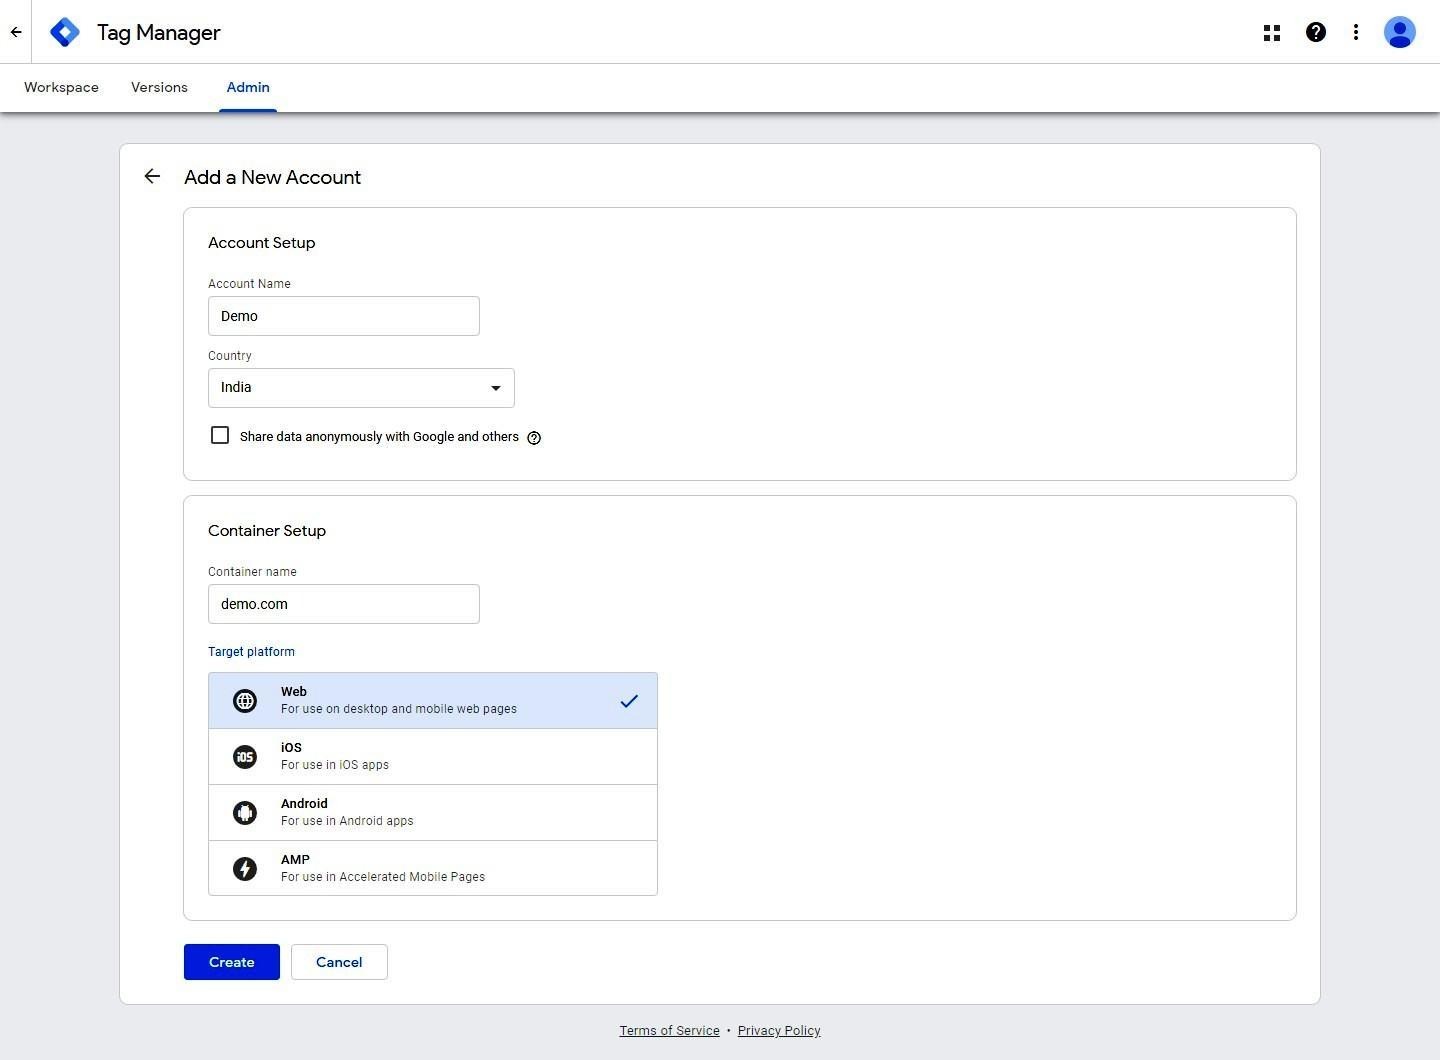
Step 1: Add an account
Account Setup:
1. Add Name as per your choice in the Account Name field.
2. Add the country in the Country field.
Container Setup:
1. Add the shop or domain name of your website in the container name field.
2. Choose the target platform that you want to keep the track of.
3. And then click Create.
You need to then adhere to some Terms of Service Agreement and if you have read it all, click on Accept box and then click Yes
And hence your new Google Tag Manager account will be initiated.
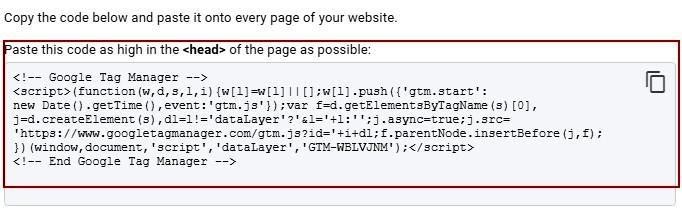
Once, you have gone through the process, you will be ready with the Google Tag Manager Snippet, as shown below:
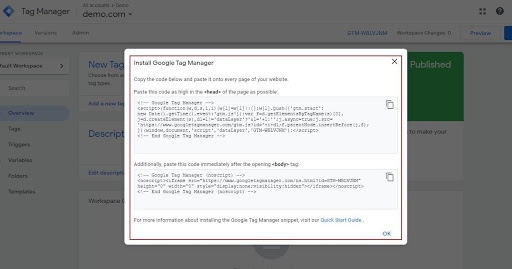
Now we need to place the below part of the code in between the <head> </head> section of your website code:
And the below code in the body section of your website code:
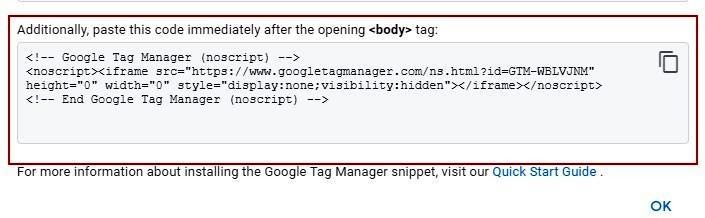
Now open your editor and add these 2 respectively in the website code.
Now, you have to plan your website as in what core elements you want to track and install in for your website.
1. First which is always important is Google Analytics which will be used for Page View Tracking.
Now, let us say that you want to track All pages
So, let's go to the Google Tag Manager and on the left side panel and click on tags or New Tag and this will open up the following tag screen as in below:
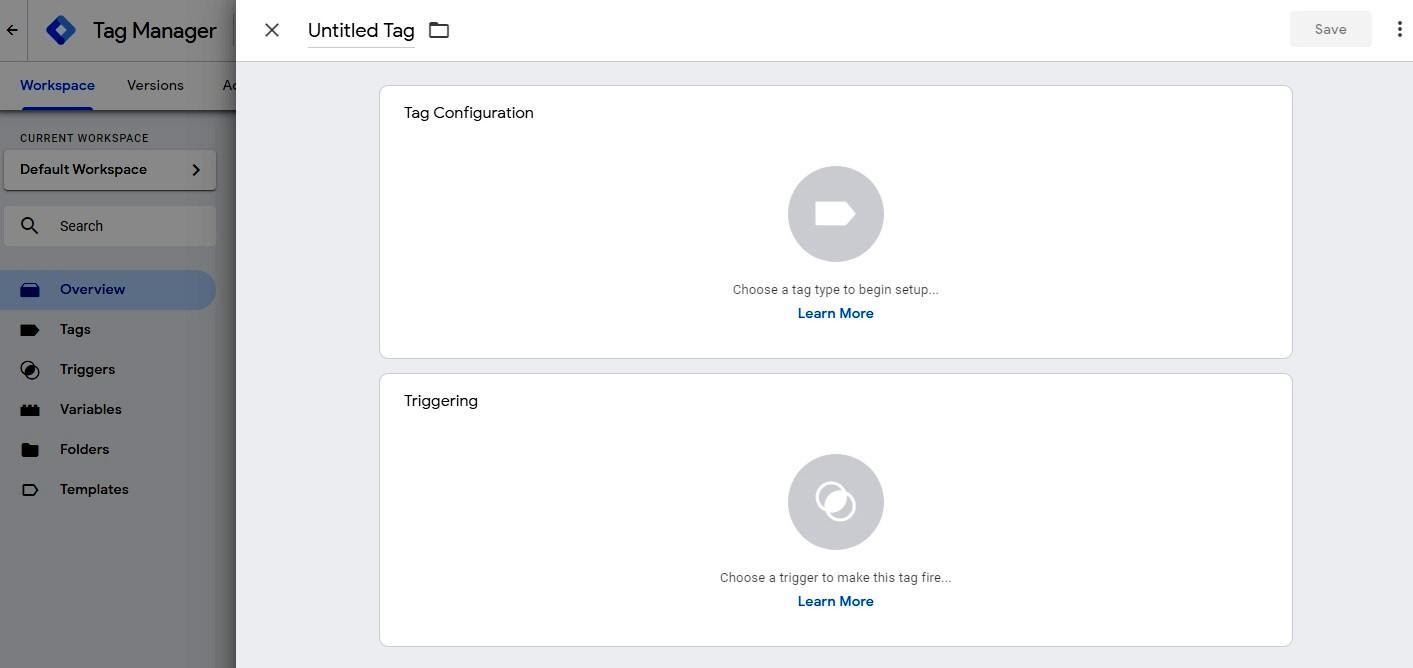
- Now, all tags, triggers, and variables in GTM receive a name for each that you can freely choose.
- Imagine you have multiple tags, multiple tools lying in your website, you won’t be able to identify them later. Hence comes the use of naming the Tags uniquely.
- Let us say you keep your Tag name as GA-pageview-All Pages.
-
Now, there comes the Tag Configuration. Click on it. It will open up and in this example choose we will choose Google Analytics-Universal Analytics.

It will give us all the different configurations as shown below:
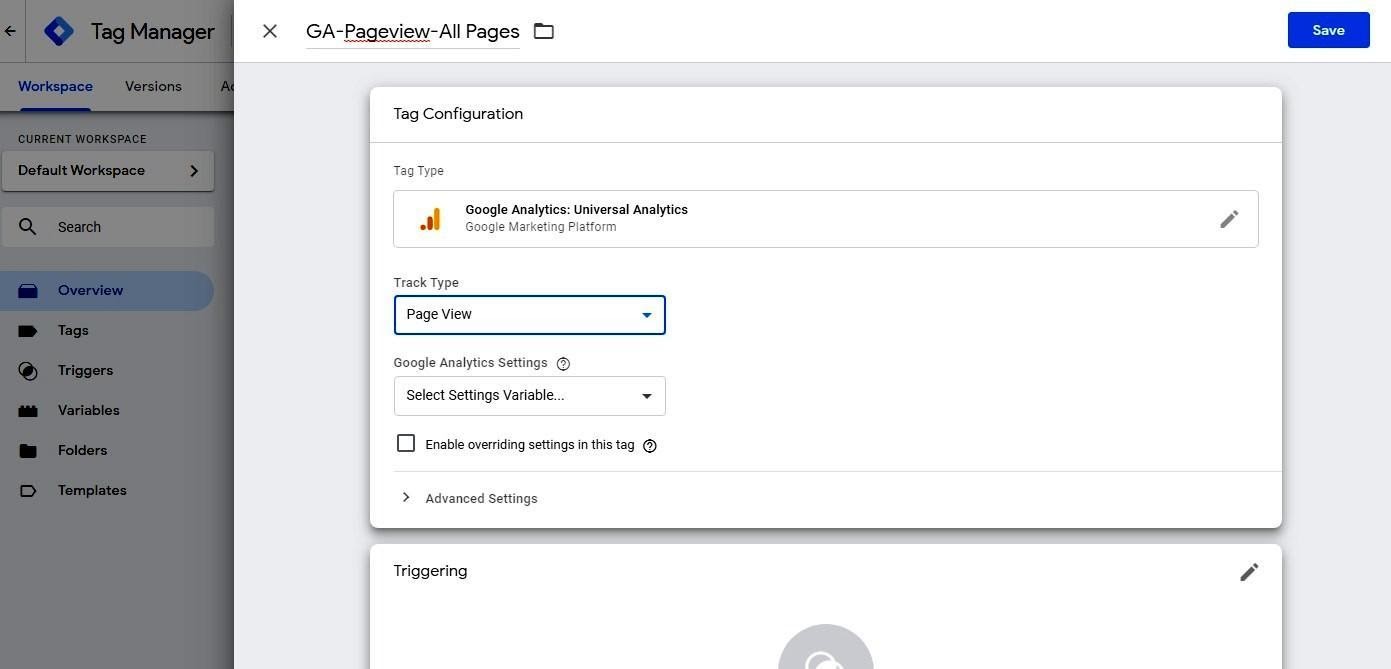
- We have all types of interactions for Track type such as Pageview, Event, Transaction, Social, etc. For this example, we will choose “Page View” from the drop-down list and then set the configuration for Google Analytics settings by choosing a variable.
-
Click on “New Variable” in Google Analytics Settings.
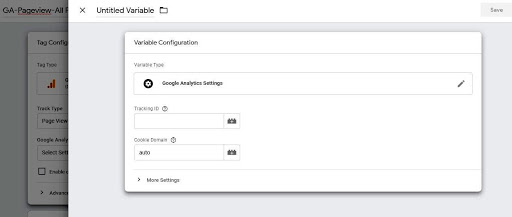
- Set the Tracking ID equivalent to the Google Analytics Account.
- Now navigate to your Google Analytics account, navigate to Settings > Property > Expand Tracking Info > Copy the Tracking ID. Paste this tracking ID into your GTM Variable Configuration under the Tracking ID field, name your Variable Configuration and Save it.
- Again go to the Tag Configuration and choose the code variable in the Google Analytics Settings field.
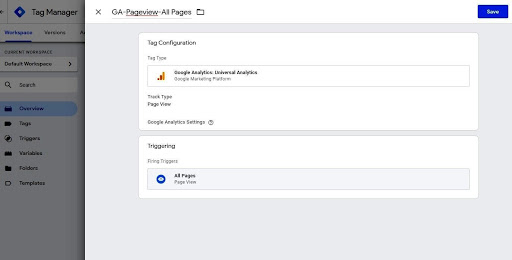
Now we will set the Trigger Configuration. Triggers are simple rules that determine when should we deploy this tag. We can set our triggers to deploy only on 1 given page, for instance, our conversion page. It is important to deploy Google Analytics-Universal Analytics on All Pages as Google Analytics will take that data and put it all together in sessions and users. So, it needs to be deployed on all pages.
- Now click on the Trigger and then select “All Pages” as we haven’t had created any triggers yet, this option will appear pre-configured.
- Click on “All Pages” and Save the configuration.
- Now All Page trigger determines where’s GTM is installed, where’s our snippet installed and every time out snippet is executed or on our page, it will also deploy our PageView Tag.
Now, click on the Tags you will see the following screen:
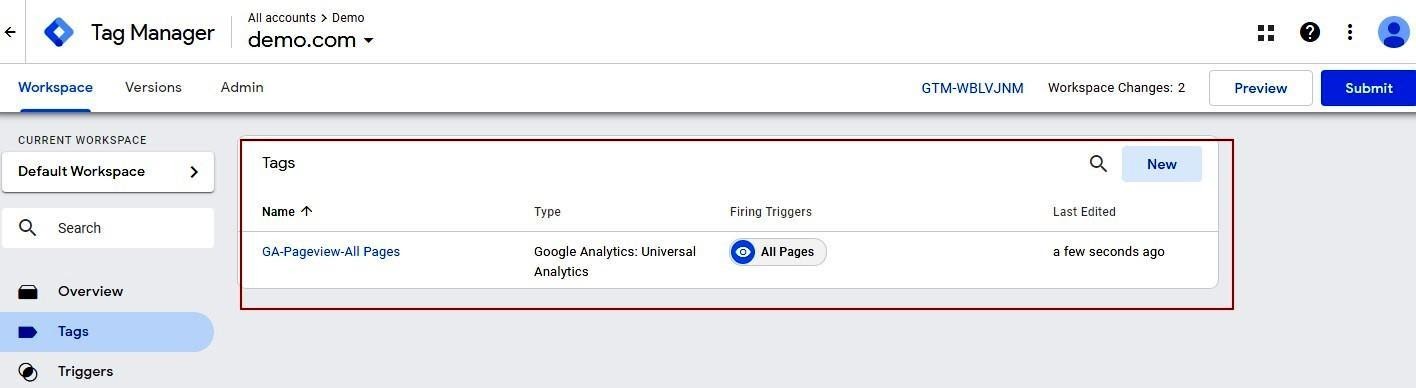
This is not yet applied to your website. To determine if it's firing correctly, we can click on the Preview mode on Google Tag Manager Page and hence it will put our browser and only our browser into its debug console.
Auto-Event Tracking Example
Suppose you want to track events or interactions like button clicks on your website, this is where Auto Event Tracking comes in the picture.
Take for example, if we want to track the ‘’Add to Cart’’ button. The first thing we will do is to deploy the listener functionality through our trigger.
- Go to the GTM Tags and name the tag as per your requirement. For instance, GA-Event-Add to Cart. Choose the Tag type as Google Analytics-Universal Analytics.
- Choose the Track type as “Event”. Now Event tracking has some parameters.
- Set the Category field as “Click”, Action field as “Add to Cart”, and choose Label from the icon
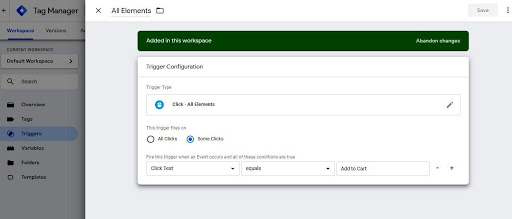
- Now go to GTM and select Trigger. A Trigger Configuration page will open. Click on the tab and then choose a trigger type. Now for button clicks navigate to Click and select All Elements. If it is a link then select “Just Links”.
-
Now if you choose the trigger fires on as “All Clicks” then the gtm.click will appear whenever and wherever you will click on your website page. To avoid this, select “Some clicks” and set variables conditions for it. Select “Click Text” in the first field. Then select “equals” in the second field and then type “Add to Cart” to track only events clicking on Add to cart button.
Save the settings and run the Preview mode for your website.
Magento 2 Google Tag Manager
- Log in as administrator to Magento.
- Click Stores on the left sidebar, and under the Settings, click on Configuration..
- Click on SALES, and click Google API.
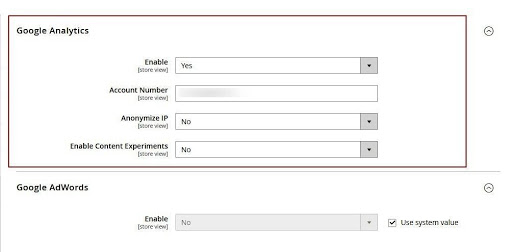
- Click on the Google Analytics
- Select Yes on the Enable list box.
- Type your Google Analytics tracking ID in the Account Number text box.
-
Choose one of the following in the Enable IP anonymization list box:
1. Select Yes to make the visitor IP addresses anonymous.
2. To track visitor IP addresses, select No. - To test individual pages in the store, in the Enable Content Experiments list box, select Yes
- Click Save Config.
Magento will enable the Analytics for your site at that moment itself.


Tell us about your project
Hire dedicated Magento developer from the vast and talented pool of resources.